

|
||
|
|
|
|
| Forgot Password | ||
|
|
Papillon Perch
Posted by Whitneydroden |
Added on : September 08, 2012 6:22pm |
Last edited: December 30, 2012 7:42pm | Viewed 5090 times
| 0 Comments | This article is also in bushel basket
and bushel basket
Papillon Perch
By: Whitney Roden
Hopefully this article, accompanied with the pictures, will assist you in making your very own chandelier butterfly feeder. It all started with my aunt having her birthday coming up and I was looking for something simple to do and love crafts. I asked her what needed to be done or worked on around the house and she showed me an old brass chandelier that she wanted to turn into something a little extra. What ensued was far from simple but I believe turned out to be very worthwhile. I would not attempt this if you are a beginning crafter.
1) First things first…go shopping to find your perfect chandelier.  (You can find them often at flea markets and/or yard sales in larger neighborhoods.) Keep in mind that the chandelier does not have to work just be structurally sound and with a sturdy chain.
2) Once you have your chandelier it is time to get to work. Before you do anything take a photo of your fixture. I know this sounds silly but I promise it will help later when it comes to reassembly. Now it’s time to take it apart. 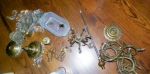 Remove the light bulbs and if you have faux candle sticks remove plastic covers then unscrew the copper wires from the conductors. I suggest doing this one at a time so you don’t lose your place. Then, remove the conductor from the “cup” where your fruit will eventually go and make sure that you keep up with all bolts and piping!
3) Next it’s what you’ve been waiting for. Time to make a complete mess and disassemble. If you are afraid you won’t remember how everything goes then simply use your camera to take a picture diagram so you can look to see how to put it all back together. At this time you will also want to detach any crystals or baubles to be reattached at assembly after finishing the project.
4) Take a pair of wire cutters and clip through the wires located in the base of your chandelier. It is much easier to remove the wires one at a time, trust me.
5) Time to get REALLY creative! Go to your local spray paint retailer and pick your color make sure it is out door paint that will adhere to the type of metal your chandelier is.  Most spray paints will need a primer to last longer which is why I chose Rustoleum hammered paint; it covers most surface imperfections and gives the piece a new life and texture. Rustoleum is also thick enough that it does not need a primer, just be sure to coat well in paint (can take up to three cans). Follow the directions on the can and be sure to paint on a drop cloth of some sort. If you do not have a drop cloth a $2 shower curtain liner at your local retailer works great.
6) After all is dry reassemble according to the pictures you took throughout the process and reattach any crystals/ baubles and make sure everything is tight. Hang from a long hook on a very thick/sturdy tree. Then add your over ripened fruit and settle in for a colorful parade of wings and beauty.
Remove the light bulbs and if you have faux candle sticks remove plastic covers then unscrew the copper wires from the conductors. I suggest doing this one at a time so you don’t lose your place. Then, remove the conductor from the “cup” where your fruit will eventually go and make sure that you keep up with all bolts and piping!3) Next it’s what you’ve been waiting for. Time to make a complete mess and disassemble. If you are afraid you won’t remember how everything goes then simply use your camera to take a picture diagram so you can look to see how to put it all back together. At this time you will also want to detach any crystals or baubles to be reattached at assembly after finishing the project.
4) Take a pair of wire cutters and clip through the wires located in the base of your chandelier. It is much easier to remove the wires one at a time, trust me.
5) Time to get REALLY creative! Go to your local spray paint retailer and pick your color make sure it is out door paint that will adhere to the type of metal your chandelier is.
Most spray paints will need a primer to last longer which is why I chose Rustoleum hammered paint; it covers most surface imperfections and gives the piece a new life and texture. Rustoleum is also thick enough that it does not need a primer, just be sure to coat well in paint (can take up to three cans). Follow the directions on the can and be sure to paint on a drop cloth of some sort. If you do not have a drop cloth a $2 shower curtain liner at your local retailer works great.6) After all is dry reassemble according to the pictures you took throughout the process and reattach any crystals/ baubles and make sure everything is tight. Hang from a long hook on a very thick/sturdy tree. Then add your over ripened fruit and settle in for a colorful parade of wings and beauty.
 |
|
|
Be the first one to comment on this article